fitness trainer
“Gluteal bridge is a basic exercise that involves several joints at once. When performing it, we actively engage the hip, knee and ankle joints. As a result, a large amount of muscles are involved at the same time: gluteal, posterior thigh, abdominal and lumbar muscles”.
The glute bridge is considered an effective exercise for strengthening the lower back, cortex, hips and legs, as well as the hamstrings. It helps to pump the buttocks and work the spine, so it is especially relevant for those who sit for 6-10 hours a day, lead a sedentary lifestyle and do not have enough time for full-fledged training in the gym.
This exercise is designed entirely for the lower part of the body, but it is of great benefit for the upper body as well. The legs and glutes are components of the cortex muscle group. Weak legs and glutes mean a weak center of the body, and it is this center that is responsible for forming a healthy posture, stabilizing the hips and spine, transferring force impulse from the upper body to the lower body, and much more.

What muscles are worked in the gluteal bridge?
- The large, middle, and small gluteal muscles;
- The biceps femoris muscles;
- The muscles that straighten the spine;
- Tensor of the broad fascia of the thigh;
- The oblique abdominal muscles;
- Semitendinosus and semitendinosus muscles;
- Calf muscles on the posterior surface of the lower leg.
Gluteal bridge: technique of performance
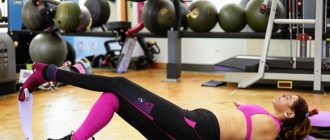
- Lie on your back. Bend your right and left leg at the knees and rest your heels firmly on the floor. Feet at a distance of 20-25 cm from each other.
- Pay attention to the position of the foot and knee joint. They are standing flat under each other, not cocked inward or outward.
- On the exhale, push the pelvis up to a straight line with the back, lingering at the top for one second or more.
- On the inhale, lower the pelvis gently to the floor for two to three seconds.
- Avoid a strong bend in the lower back as you lower yourself down. To do this, control your pelvis and keep your buttocks and abs under slight tension.
Perform two or three approaches for 10-15 times. Rest between approaches – two minutes. Use additional weights to increase efficiency. You can also increase the number of repetitions.
What do scientists say?
According to studies, gluteal muscles showed high activity when using a rubber expander, as well as when performing different variants of the gluteal bridge on one leg.
Using electromyography, they determined that the level of gluteal muscle activity varies with different variations of the gluteal bridge. For example, with feet on the fitball from 0% to 20%, variants of gluteal bridges on one leg, including foot on bosu, showed from 21% to 60%. The gluteal bridge on one leg with a 90-degree flexion angle with the foot fully on the floor had the highest rate.
Benefits of the gluteal bridge
The glute bridge has many distinct benefits that make it a favorite of many beginners and experienced lifters alike.
- You get high gluteal muscle activity, and higher than squats.
- You effectively strengthen your cortex, legs, and gluteal muscles.
- You can adjust the load by moving your feet closer and further away from your body.
- You eliminate the possibility of injury, so the exercise is actively used in rehabilitation of the musculoskeletal system.
- You can do it even with problems with the spine and overweight. For example, the same squats and lunges in such circumstances can do harm.
- You improve pelvic circulation and hip joint function.
- You improve the health of your spine.
- If you have knee joint pain, in this exercise you put minimal pressure on it, which is almost impossible to avoid in squats or lunges.
Harm and contraindications
If you want to get the maximum benefit from training and protect yourself from injuries and unpleasant situations, ideally before starting any exercise it is worth consulting with a physical education specialist who understands exercise. This could be a doctor, an instructor or a fitness trainer. He will assess the condition of the musculoskeletal system and help build a competent training program based on your individual performance.
Even such a harmless exercise, such as gluteal bridge, has a number of contraindications and can cause harm, for example, when:
- acute pain in the lumbar spine;
- the presence of large hernias in the period of exacerbation;
- the presence of high blood pressure.
Contraindications for this exercise are few, and all of them relate to periods of exacerbation of diseases. Also carefully do gluteal bridge during pregnancy. In this period, any loads must necessarily pre-negotiate with your doctor.
Types of gluteal bridge
Gluteal bridge on one leg
Technique
- Lie on your back. Bend the right leg at the knee and firmly rest the heel on the floor. Place your left foot on the thigh of your right leg. Pay attention to the position of the foot and knee joint. They are flat under each other, not cocked inward or outward.
- As you exhale, push your pelvis up to a straight line with your back, lingering at the top for one second.
- On the inhale, lower the pelvis gently to the floor for two to three seconds.
- Avoid a strong bend in the lower back as you lower yourself down. To do this, control your pelvis and keep your buttocks and abs under slight tension.
Perform two or three approaches for 10-15 times. Rest between approaches – two minutes. Use additional weights to increase efficiency. You can also increase the number of repetitions.
Gluteal bridge with an espander
Technique
- Lie on your back. Bend your right and left legs at the knees and rest your heels firmly on the floor. Place your feet close to each other. Clamp the espandex just above your knees. Pay attention to the position of the foot and knee joint. They are flat under each other, not cocked inward or outward.
- As you exhale, push your pelvis up to a straight line with your back. Next, spread your hips apart to feel the resistance of the espandex.
- Hold this position for one second or more. As you inhale, bring your hips together and lower your pelvis gently to the floor for two to three seconds.
- Avoid a strong bend in the lower back when returning to the starting position. To do this, control your pelvis and keep your buttocks and abs under slight tension.
Perform two or three approaches for 10-15 times. Rest between approaches – two minutes. Use additional weights to increase efficiency. You can also increase the number of repetitions.
Gluteal bridge with an outstretched leg
Technique
- Lie on your back. Bend your right leg at the knee and rest your heel firmly on the floor. Straighten the left leg forward and fix it in this position. Pay attention to the position of the foot and knee joint. They stand evenly under each other, do not collapse inward or outward.
- As you exhale, push your pelvis up to a straight line with your back, lingering at the top for one second.
- On the inhale, lower the pelvis gently to the floor for two to three seconds.
- Avoid a strong bend in the lower back when returning to the starting position. To do this, control your pelvis and keep your buttocks and abs under slight tension.
Perform two or three approaches for 10-15 times. Rest between approaches – two minutes. Use additional weights to increase efficiency. You can also increase the number of repetitions.
Gluteal bridge with wide and narrow leg placement
Technique
- Lie on your back. Bend your right and left legs at the knees and rest your heels firmly on the floor. Place your feet narrow or wide. Pay attention to the position of the foot and knee joint. They stand evenly under each other, do not fall inward or outward.
- As you exhale, push your pelvis up to a straight line with your back, holding at the top for one second or more.
- On the inhale, lower the pelvis gently to the floor for two to three seconds.
- Avoid a strong bend in the lower back as you lower yourself down. To do this, control your pelvis and keep your buttocks and abs under slight tension.
Perform two or three approaches for 10-15 times. Rest between approaches – two minutes. Use additional weights to increase efficiency. You can also increase the number of repetitions.
Common mistakes when performing gluteal bridge
The emphasis in the neck, not in the center of the shoulder blades. It is important to put the emphasis in the shoulder blades, and the neck should not be strained.
Loss of stability and relaxed abs. It is important to maintain a stable pelvic position and tense abs, then the muscles will work optimally.
Fast speed of execution. Use different variations of the pace of the exercise – from medium to slow.
Lack of fixation in the upper position. It is important to fix the pelvis in the upper point for one second or more, and then slowly lower it to the floor. Throwing the pelvis down is not allowed.
How to effectively do the gluteal bridge?
To get a noticeable effect, you need to competently build a training process. Here are some tips on how to do this.
- Hone the technique with your own weight and only then go to an additional weight. It is best to use a short barbell or a dumbbell. They should be placed in the groin area, below the navel.
- Use different variants of the pace of the exercises – from medium to slow. You can do gluteal bridge with a barbell in 30 or 60 seconds. At a slow pace, you will engage more muscle fibers and eliminate inertia.
- Gradually increase the weight of the additional weight. When you realize that you can easily do 15-20 reps with the weight you are used to, increase the weight by 5-10%. Don’t chase big weights, prioritize proper technique and slow but steady progress.
- Increase the total tonnage over the course of the workout. You can do gluteal bridge with 10 kg dumbbells for 15 reps, or you can do it with 15 kg for five reps. In the first case, the tonnage of the load on the muscle was 150 kg, and in the second case – 75 kg.
- Change the rest time between approaches. For example, earlier this interval was 90 seconds, and now the rest time between approaches with the same weight is 60 seconds. This means that the muscles have become more efficient in carrying the load and have improved their performance.
- Use different types of glute bridge. Make your workouts varied to make it fun to train.

Which is better: squats or glute bridge?
There is no one answer to the question of whether squats or glute bridge is better. They are two different exercises that complement each other, but do not replace each other. They can solve one problem or work on different problems.
For example, if you have doubts about the health of your joints and back, but want to be physically active and keep yourself in shape, it is better to prefer the glute bridge. On the other hand, if you have no serious problems with your spine, knee and hip joints, no pain in these areas – feel free to include squats in your workouts.
If you want to pump up your glutes and make your legs more relief, training with your own body weight for the desired changes will not be enough for both exercises. Only training with additional weights will help you pump your glutes and keep your lower body at a high level of fitness.

Indeed, with properly structured workouts, for the first time you will be enough and your own weight to tighten the gluteal muscles. However, if you want to increase their size, and not just tone them, you will have to get collapsible dumbbells or other equipment.
Perform different types of gluteal bridge once or twice a week – three to five approaches of 15-20 times to maximize the benefits for your body. Be sure to supplement the program with other exercises. Observe proper technique and be aware of contraindications.


